This is somewhat targeted at Haqqislam players, but I hope it will be helpful to anyone who is struggling with weathering their Reactive turns.
One of the most common issues new Haqqislam players have is stopping strong gunfighters. Shooting is definitely not Haqqislam’s strong point, and if you try to just go toe-to-toe with a shootier faction, it often doesn’t work out in your favour. What this turns in to frequently on forums and social media is “My opponent had X Fireteam and I had Y and I can’t think of a better ARO piece and I still couldn’t stop them.” The same advice is given, but it can be a complex idea to digest in a single social media comment, so I hope I can clarify some of the common advice I see given and give a more complete answer to this question.

My Deployment Zone. Red circle is Tuareg in Hidden Deployment.
For the sake of a visual, here is my deployment in my last game. I was playing Vanilla Haqqislam, my opponent was playing Steel Phalanx, the mission was Highly Classified, and I was deploying first.

Rest of the table. Red circle is the section my Bashi Bazouk will be coming in on. Left Camo is a Al Hawwa’ Assault Hacker, so I have some sort of area defense next to my HVT (tucked next to that blue crate.) Right Camo is a Farzan Forward Observer, so I have a mission-relevant specialist Infiltrated on the other side of the table, should his HVT go in that area.
What I look for when I’m deploying is not lanes that go back to my opponent’s troops, but lanes which my opponent might use to approach the objectives. I’m more interested in controlling portions of the table than I am in locking down particular units, or in limiting their deployment options. I will also choose lanes which give me the best chance of achieving a range band advantage.
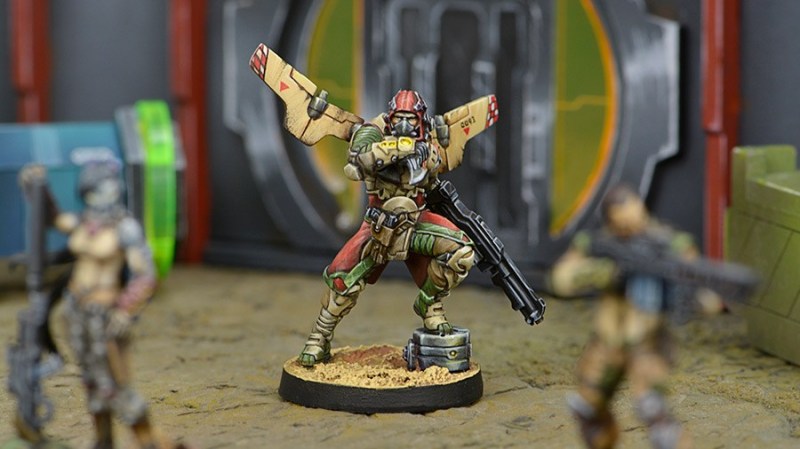
I generally prefer not to deploy troops on rooftops, since it limits their options later in the game, but if you look at where I put my Lasiq Viral Sniper you’ll see that by placing it where I did I was able to cover multiple long, wide sections of the board, so my opponent had very little option but to neutralize the Lasiq before proceeding with the Mission, and also very limited options for dealing with it outside of its good range. The Lasiq did not survive the game, and I was frankly surprised it lasted as long as it did. The point of putting it there, though, was not to decimate his forces with Viral rounds. That would be nice, but what I wanted and what I achieved was to drive my opponent to spend orders doing something that was not the Mission. What the placement of the Lasiq accomplished was my opponent moved his Enomotarchos around the long way to try to get into more favorable range bands before engaging, which took up a lot of his Orders, and steered him into a trap.

Fire lanes from both snipers are indicated above. I didn’t mark them, but you can see that there is intersecting LoF in most directions from other troops as well.
I cannot emphasize enough how powerful Hidden Deployment is. Now, as far as Haqqislam goes, only Vanilla has access to it, so I won’t linger on this particular too long, but any time you can deny your opponent the knowledge of when, where, and how part of your army will engage with his, that unknown threat is tremendously powerful. Even if they expect it, they’ll be spending Orders to move more carefully. If they don’t expect it, you’re getting shots off that they weren’t anticipating, and are probably very favorable to you. AD can function similarly, and was also a big part of my victory in this game. To continue the recounting of events, my opponent moved his Enomotarchos to try to achieve more favorable range bands before exchanging fire with my Lasiq. (I should say I removed Teucer and Phoenix in my first turn, and the rest of his army was limited to rifle ranges at best.) He went the way I wanted him to and was caught unawares by my Taureg Sniper. If you refer back to the deployment photo, you’ll notice that I didn’t use the Taureg’s Infiltration. I had wanted to Infiltrate onto a side of the board somewhere to cover a horizontal lane, but I set up terrain diagonally like that specifically to help break those up more and there wasn’t a place I liked as well as this one spot in my DZ. That was, again, because it gave me good coverage of a path I expected him to use to approach the objective. I knew he’d have to go after my HVT, so I had both the Tuareg and the Lasiq overlooking it, and my opponents primary lanes of approach to it. With his MSV gone, and no way to touch the Tuareg with a template without weathering a lot of fire to get close enough, my opponent went down the middle approach, still in bad range bands against the Lasiq, but without the Tuareg to worry about. At that point he ran out of orders, Enomotarchos extended almost to the midpoint of the table, with very little watching their back.
I mentioned that AD is another source of a mysterious threat vector. Even veteran players can be caught by AD, not because they don’t think you have it in your list, they know how to count points, but because you just can’t cover every angle all the time. Which is why my Bashi Bazouk didn’t come in until turn 2, behind Hector. It wasn’t the perfect place, I had to be in view of the Myrmidon Officer in order to be out of a Charybdis bot’s Flamethrower range, but thankfully she picked the wrong Holoecho. I then proceeded to pump Hector’s back full of AP rounds (I took a gamble here by lining up for a Chain colt shot instead of taking cover, and it paid off. He Dodged with both troops until Hector was dead, and I was able to finish off the Officer with the chain colt next.) Now this doesn’t have anything to do with AROs, but it is still a deployment issue. The Bashi Bazouk is a parachutist, so I needed to pick which edge I would come in on at the beginning, and I picked the one that I foresaw being unguarded after he started to advance. Again, I’m not lining up shots at the moment of deployment, I’m deploying to control portions of the board. The more influence you can assert on the table, the better you can anticipate what you may need to face during your Reactive turn.
All that said, this is, of course, a dice game. I had some really clutch crits in the beginning of the game, that made a huge difference for me. I only needed one order to take out Teucer, and we were on fairly even odds for that. Phoenix I knocked out by shooting through smoke with my Djanbazan, another thing which not all of Haqqislam can do, and I happened to double crit on that roll. Phoenix and Teucer both could have won those rolls, but they didn’t, and it dramatically limited my opponents options for answering the questions my snipers asked.


Wow that terrain is really cool. It looks like you’re fighting over a bunch of shipping containers turned into a makeshift settlement.
You know I don’t remember who makes it. It came from a Kickstarter a local who got out of Infinity before I even started backed, then yet another player who isn’t really playing anymore bought the set from him and donated it to live in the store. That’s the blue and green stuff, at least. The unpainted is from Hyperion Lasers which is run by a local and hasn’t really gone public yet, but it’s nice stuff. The problem we have with the blue & green is the rooftops don’t separate, so the interiors are really impractical to use.
Thank you, basically a good article but I’ve got some critiques:
Your advice is sound, but I feel it’s incomplete and that your example was a fluke. Let me explain. I believe you deployed first and had first turn?
Long range AROs typically drain your opponent’s Orders by denying areas of the table until your opponent deals with it. Since HMGs and the like are so effective at taking down snipers (in most situations), a model deployed in line of sight of the enemy deployment zone before the enemy’s last model deploys is typically asking to die.
Your Lasiq tried to cover most of the table at once: if you hadn’t been able to take out all your opponent’s big guns it would probably have died in their first order. So your opponent misdeployed by leaving their guns too exposed and/or you made some amazing play you haven’t mentioned.
If you somehow expected to take out the opposing heavy weapons turn one and planned to drop your Lasiq prone if you failed, then that’s another matter entirely.
Thank you for your feedback, I really appreciate it.
I agree with you about not wanting models deployed in line of sight of the enemy DZ, and I tried to expressly say you shouldn’t be deploying in order to have LoF to the enemy DZ, was I not sufficiently clear in that? You are right that there are parts of the DZ the Lasiq could see. It may not be clear in the photos, but with the terrain placement and the LoF of my other models, my opponent only had a few options where he could deploy to engage with the Lasiq without receiving multiple AROs. My Fiday was my reserve, so I had deployment knowledge when I placed it, but where I placed it also limited his choices for engaging with the Lasiq. There were essentially three places on the board he could have deployed in order to shoot at the Lasiq with a coordinated order, and they were all adjacent to each other. There was only one place he could have advanced an HMG to shoot in good range with cover, and he would have had two AROs to deal with. More importantly, I considered the Lasiq there to deter movement, and I considered her expendable.
One edge I had in this game that is really hard to explain is that I’m very familiar with the opponent I had, so to a degree I can predict what he’s going to do. I also had first turn so I knew I had at least that one turn to wear him down before my Snipers had to weather the storm. I did need Teucer out of the way first, and after considering the tools I had I actually decided to risk the Lasiq and won the face to face. All I had going for me in that exchange was one extra die, and luck happened to be on my side. For Phoenix I laid down smoke, and shot at him with the Djanbazan HMG. The Enomotarchos was still full, so no -6, but I didn’t need to worry about additional AROs, and again, luck was on my side and I rolled two crits. In retrospect using the Lasiq alone to get rid of Teucer was an unnecessarily risky play and I should have used a coordinated order, but I wasn’t thinking about it. I just wanted to save the Djanbazan for Phoenix and that was the first thing that came to mind.
So there’s a lot of luck in there for dealing with the heavy weapons, but the important part is the Lasiq was expendable to me, so I wasn’t worried about keeping it alive for 2nd or 3rd active turn work. Dropping the Lasiq prone would have removed it from my reactive turn and that wasn’t what it was doing for me.
If he had kept his heavy weapons more hidden he could have hit me harder when his turn came around, but I would have had free reign to score objective points. Given that I spent like 7 orders trying to Hack the HVT and never rolled lower than a 15, that may not have helped me, but I’d have a lead that he couldn’t take away from me easily. If it were a killing mission, the considerations might be different, but letting four Mutts into the middle of the table freely would not be good in any kind of mission.
Did that help shine some light on the choices I made in this particular game? I do admit that this game wasn’t the best example I could use, but it was the most recent, and I had a request for a battle report showing Vanilla Haqqislam winning against a Sectorial, so using it let me do double duty. I’d like to revisit this topic later when I have a game with some better examples.
Sorry it’s been a while, I only approved notifications after your reply had already happened. I’ll reply to parts of you comment separately, since this conversation has split into several smaller topics.
“Thank you for your feedback, I really appreciate it.”
Good to hear, I appreciate your clear article too, even if I think the example’s bad.
“I tried to expressly say you shouldn’t be deploying in order to have LoF to the enemy DZ, was I not sufficiently clear in that?”
You said that clearly, but the Lasiq’s deployment looks like a perfect example of how to waste a sniper: trying to cover the whole table on turn one.
“my opponent only had a few options where he could deploy to engage with the Lasiq without receiving multiple AROs.”
Pie Slicing. It’s really hard to force stacked AROs, so your opponent would have shot them one at a time. Based on what I can see it wouldn’t even be hard to position. Except for Hidden Deployment, of course; that can get you one or two stacked AROs.
“My Fiday was my reserve, so I had deployment knowledge when I placed it…”.
A good way of eliminating one counter. Unless I’m simply missing it, I can’t see a mention of your Fiday in the article, I assume it held the right flank?
“There was only one place he could have advanced an HMG to shoot in good range with cover”.
I can’t tell the distances properly from a photo, but aside from where he tried there was the center building (approached from either the ground or over the bridge) and your whole right flank. What was blocking those?
“I considered the Lasiq… expendable.”
She’s too expensive to throw away, it looks like it would only take a surviving HMG an order or two to kill her. As an Aro piece I agree she’ll die most games, but one this expensive needs to absorb more than two orders: usually by drawing an HMG half way across the table and into an exposed location. Slowing down the enemy by one or two orders is for the likes of Warcors.
“One edge I had in this game that is really hard to explain is that I’m very familiar with the opponent I had, so to a degree I can predict what he’s going to do.”
This is extremely powerful, knowing your opponent can completely justify almost any move.
“I also had first turn so I knew I had at least that one turn to wear him down before my Snipers had to weather the storm.”
So you planned to alpha strike, then maintain pressure with AROs so he couldn’t recover?
“Teucer… luck happened to be on my side. For Phoenix I… shot… him with the Djanbazan HMG. So there’s a lot of luck in there for dealing with the heavy weapons”.
It sounds to me like your opponent left his (surprisingly few) guns covering your deployment zone and you just shot them. Did your Djanbazan have to go far, at least?
“…I wasn’t worried about keeping it alive for 2nd or 3rd active turn work. Dropping the Lasiq prone would have removed it from my reactive turn and that wasn’t what it was doing for me.”
I think there’s a place for a model moving out to cover the whole table on a later turn, but as I said above a Lasiq is too expensive for somewhere which looks easy to remove.
“If he had kept his heavy weapons more hidden he could have hit me harder when his turn came around, but I would have had free reign to score objective points.”
It’s sounding like your opponent deployed too aggressively, exactly what this article is saying he shouldn’t do. Was there nowhere he could cover the objectives without having line of sight to right in front of the big guns in your deployment zone?
“I do admit that this game wasn’t the best example I could use…”
It feels like a good example from your opponent’s perspective of what happens when they DON’T follow the article.
The rest of the article’s good, but I’m still unconvinced that it’s a good idea to deploy an elite sniper in spitfire range of a large building in front of the enemy deployment zone; which is what the Lasiq looks like.
It sounds like you won this game by covering the whole table with your AROs and successfully scalpeling out your opponent’s heavy weapons. A valid option, if unreliable, just not what the rest of the article seems to advocate.
I think the height might be what’s hard to discern in my photos, and I’ll try to take clearer ones next time. Because of the height and angle of the buildings in the center a lot of the center LoF for the Lasiq was just rooftops. This is where my familiarity with my opponent gave me an edge. I knew he’d have Teucer, and maybe Atalanta. I knew he’d put them on rooftops with good view of most of the table. I could narrow that down fairly safely to 3 or 4 locations. There was a small chance he’d put Phoenix on a rooftop with good view of the table as well, but only if it had a ladder for him to move with the Enomotarchos, which he didn’t have good options for.
That’s right, what I thought would be the best place for Teucer was on either flank, and I was pretty sure he was his reserve, so I put the Fiday on the right in order to encourage him to deploy on the left in the Taureg’s LoF.
As for the HMG ranges – I had camo tokens deployed next to the very middle building, and the right of center building. In order to circle the buildings on the other end the Lasiq would see him further away, and at least one other model in my DZ would also have an ARO.
I think you and I may just disagree on where we draw the line with cost of a unit and taking risks. I started with HB before HSN3, so there was a glut of ~25 point models and without Leila and the rarity of Spec Ops tournaments the defensive Ghulam link wasn’t really tempting. The backbone of most of my lists was alternating between Muyib and Lasiq fire teams, so I’m just used to putting models of that cost into danger.
Additionally, on the HMG concern, Steel Phalanx doesn’t have an MSV HMG, so they’re always going to be shooting at at least -3, and with four Muttawi’ah, a Fiday, and a Muyib w/ LGL, I had pretty decent chances to lay down smoke if he found a favorable approach. That’s why I don’t really like comparing the offensive abilities of two possible combatants in vacuo – synergy is so important in Infinity, it’s practically discounting half the game.
Yes, I planned to Alpha Strike his big guns with the knowledge that he tends to rely on a couple long range gunfighters and one very expensive Enomotarchos, and if I removed his heavy hitters in my first turn, he’d have a hard time turning the game back around.
Teucer he deployed in order to counter the Lasiq, which I expected. I had intended to use the Djanbazan to remove Teucer, but I actually ended up using the Lasiq because it was in better position. The Djanbazan I needed to spend… four orders to remove Phoenix? One impetuous to move a Mutt, one Irregular for it to put down smoke, then two regulars to position and shoot with the Djanbazan.
Phoenix was covering one of the lines of approach to his HVT, but I was able to cover that with smoke and move up my specialists. I actually did that before killing him. Phoenix’s positioning wasn’t that bad. There was one lane he didn’t have cover in, which Teucer would be able to see me approach, if I hadn’t killed him already. He also had I think two others watching over Phoenix’s shoulder in that direction, but I shot through smoke.